

A well-designed marine setup does more than just power your gadgets. It protects your investment and supports safe navigation every time you leave the dock. Proper planning ensures you never get stranded in open water.
Ensuring your vessel responds exactly as it should requires regular attention to its core components. Reliability on the waves starts with understanding how your boat handles power. This knowledge is vital for every responsible captain.
Neglecting routine electrical system checks can lead to serious hazards like fires or equipment failure. These simple steps prevent costly repairs and keep your family safe while cruising. Small issues often hide behind panels until they cause a major breakdown.
A quick wiring check helps identify loose connections or corrosion before they become dangerous. You should also look for frayed insulation or signs of heat damage near terminals. Catching these early saves time and money during the boating season.
Proper battery maintenance ensures you have the power needed for critical engine starts and emergency gear. Keeping terminals clean and inspecting voltage levels prevents unexpected failures at sea. A healthy bank of batteries is the heart of your onboard electronics.
Following ABYC safety standards helps prevent shock hazards and ground faults. This guide will help you master visual inspections and circuit testing to keep everything running smoothly. You will learn to spot possible hazards before they ruin your next trip.
How to Conduct a Safety Inspection
Keeping an eye on your boat’s power system is key to safe and worry-free sailing. Do a full check-up at least once a year to catch small problems early. This helps avoid big repairs or dangers at sea.
Knowing your boat’s condition is the first step to safety. Many owners miss the small things that can cause big power failures. Regular electrical safety inspections give you peace of mind and protect your investment.
Start by turning off the power to avoid shocks. Use tools and a flashlight to explore dark areas. Consistency is the key to keeping your boat reliable all season.
Visual Inspections and Testing of Circuits
Begin by checking the insulation on all wires. Look for cracks, brittleness, or melting. These signs mean the wire has been damaged by heat or UV rays.
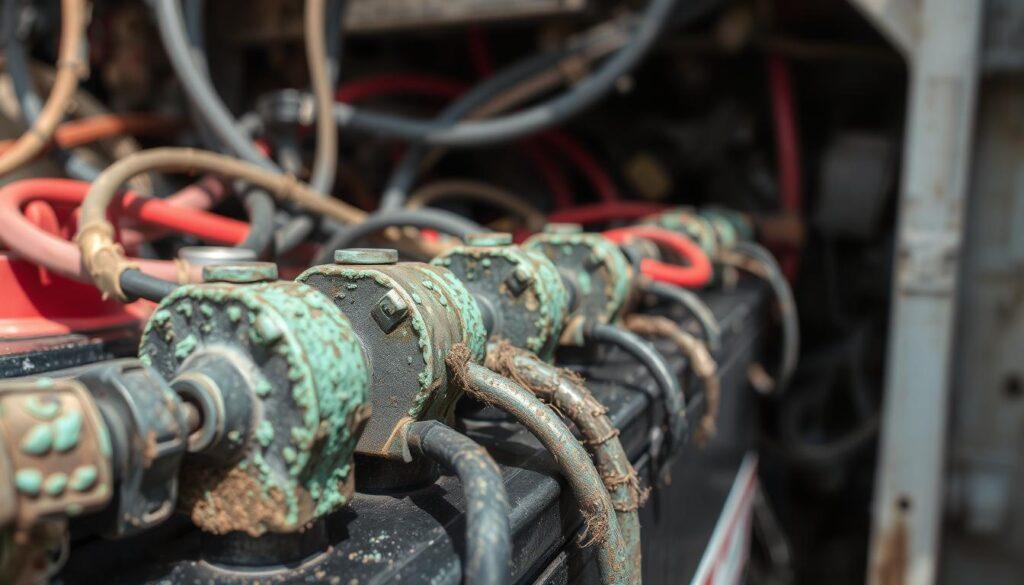
Next, check the terminals and connections for corrosion. Green or white powdery buildup means high resistance and overheating. Make sure all connections are tight to avoid power loss.
Then, test the circuits with a multimeter. Check for the right voltage levels at different points. This confirms power is reaching your devices correctly.
Electrical safety means spotting hidden problems early. If a circuit shows uneven readings, it might have a hidden fault. Always note your findings to track system changes.
- Check battery terminals for tightness and acid leaks.
- Inspect the fuse box for blown fuses or scorched plastic.
- Verify that all wire supports and zip ties are secure.
- Look for moisture near electrical panels or junction boxes.
By following these steps, you ensure your boat’s health. Testing of circuits makes sure your lights, pumps, and radios work when needed. Never ignore flickering lights or warm wires, as they signal a problem.
| Inspection Point | Common Issue | Recommended Action |
|---|---|---|
| Wire Insulation | Cracks or melting | Replace damaged wire sections immediately. |
| Terminals | Corrosion or buildup | Clean with a wire brush and apply protectant. |
| Circuit Voltage | Significant voltage drop | Check for loose connections or undersized wire. |
| Grounding | Loose ground wires | Tighten all connections to the ground bus bar. |
Identifying Corroded Connections and Loose Wires
Small problems like green crust on terminals or loose connections can cause big issues. In a marine setting, moisture and salt air speed up metal decay. Corroded connections block current flow, leading to heat and possibly fire.
Engine or water vibrations also play a part in system failures. These movements can make loose wires detach from their spots. Even a tiny screw issue can lead to power loss or system failure unexpectedly.
Choosing the right materials is key to fighting off the elements. The table below shows why specific wiring is vital for reliability in harsh conditions.
| Feature | Standard Automotive Wire | Marine-Grade Wire |
|---|---|---|
| Conductor Material | Bare Copper | Tinned Copper |
| Corrosion Resistance | Low | Superior |
| Flexibility | Moderate | High (Finely Stranded) |
| Moisture Barrier | Basic Insulation | Sealed Tinned Strands |
Tips for Inspecting and Maintaining Electrical Components
Regular electrical maintenance is essential for smooth operation. Start by gently pulling on every wire to check if it’s tight. If a wire moves, tighten the terminal or replace it to avoid arcing.
Visual checks are also critical for spotting issues early. Look for “green death,” the powdery oxidation on copper parts. Clean terminals with a wire brush and apply a thin layer of dielectric grease to block out moisture.
- Ensure all wires have proper strain relief to prevent pulling at the joints.
- Replace any brittle or cracked insulation immediately to avoid shorts.
- Use heat-shrink tubing on all new connections for a watertight seal.
Marine-grade wire is vital because it has finely stranded, tinned copper conductors. This tinning protects the copper from air and moisture, preventing corroded connections. Regular electrical maintenance and checking for loose wires keeps your vessel powered and safe for every trip.
Essential Tools for Electrical Maintenance
You can’t fix marine electricity without the right tools. The right gear ensures repairs are safe and last in saltwater. Always use marine-grade wire to avoid corrosion.
Also, stick to the ABYC wire color code for an organized system. This makes it easy for others to understand. Having these tools makes tasks safer and more efficient.
Multimeters, Wire Strippers, and Circuit Testers
A multimeter is key for your toolkit. It checks voltage and continuity. Accuracy is key for electronics that need specific power.
Use a multimeter to check if batteries are charging right or if wires are broken. Make sure it’s rated for the voltage you’re testing. Digital models are better in a rocking boat.
A wire stripper helps remove insulation without damaging the wire. It must handle different gauges for high-quality stranded copper. This keeps connections strong.
Proper stripping prevents electrical fires. Choose a wire stripper with a comfortable grip for long projects. This reduces hand fatigue.
A circuit tester gives a simple “yes or no” answer to power questions. It’s a handheld probe that lights up when it finds electricity. It’s great for checking switches or light sockets without complex settings.
It’s very useful in dark engine rooms. While it offers less detail than other tools, it’s fast for quick checks. Every boat owner should have one.
| Tool Name | Primary Purpose | Best Use Case |
|---|---|---|
| Multimeter | Measures voltage and resistance | Complex diagnostics and battery health |
| Wire Stripper | Removes insulation safely | Preparing wires for new terminals |
| Circuit Tester | Detects live electrical current | Quick fuse and power verification |
Troubleshooting Common Electrical Problems
Electrical failures at sea can be serious. Knowing how to diagnose problems is key. Electrical fires are a major cause of boat damage and sinkings in the U.S. Regular care and proper installation can prevent these dangers.
Having a plan for troubleshooting is important. It helps protect your boat and passengers. Spotting early signs can prevent big problems. Safety is always the top priority when dealing with electrical systems.
Short Circuits, Overloads, and Ground Faults
A short circuit happens when electricity takes a wrong path. This often results from damaged insulation or a wire touching metal. You’ll see a blown fuse or tripped breaker right away.
An overload occurs when you use too much current. This is common when adding new electronics without upgrading wiring. Wires may get hot, and the breaker will trip soon.
A ground fault is when electricity leaks to the ground. This is very dangerous in water because water can carry the current. Use a GFCI outlet to detect and stop these leaks quickly.
| Problem Type | Common Symptom | Primary Cause |
|---|---|---|
| Short Circuit | Instant fuse failure | Damaged wire insulation |
| Overload | Tripped breaker over time | Too many active devices |
| Ground Fault | GFCI outlet trips | Moisture in connections |
To fix these problems, follow these steps:
- Disconnect the power source before touching any wires or terminals.
- Look for signs of discoloration or melting on the insulation.
- Use a multimeter to test for a short circuit between hot and ground wires.
- Reduce the load to avoid an overload by turning off non-essential electronics.
- Clean and dry wet components to prevent a ground fault.
Keeping your electrical locker clean and dry is key. Use marine-grade components to keep your boat safe and reliable.
When to Call a Professional
Knowing your limits is key to keeping your boat safe and reliable. Many boat owners enjoy fixing and upgrading their vessels on weekends.
But, marine electrical systems are different. They face harsh, damp conditions. A small error can cause fires, sinking, or even electric shock drowning.
It’s important to know when you need electrical expertise to protect your passengers and boat. A professional ensures your boat meets strict maritime safety standards.
Situations That Require Expert Assistance
Always get a professional electrician for critical safety systems. This includes bilge pump circuits, fire suppression monitors, and high-voltage AC shore power connections.
Specialized gear like lithium battery banks or complex inverter systems need electrical expertise. Incorrect setup can harm your boat.
If unsure, look for the right repair shop. Experts have tools to find hidden issues that a standard multimeter might miss.
| Task Type | DIY Recommended | Professional Required |
|---|---|---|
| Basic Lighting | Replacing bulbs or simple fixtures | Installing underwater LED systems |
| Battery Care | Cleaning terminals and checking fluid | Installing high-capacity lithium banks |
| Navigation | Mounting a basic GPS unit | Integrating NMEA 2000 networks |
| Shore Power | Inspecting the power cord | Replacing the main breaker panel |
When looking for help, find technicians certified by the American Boat and Yacht Council (ABYC). Their training ensures they know about galvanic isolation and grounding.
A professional electrician will give a detailed estimate and explain the work. Never hesitate to ask for credentials before letting them work on your boat’s electrical system.
Planning an Upgraded Electrical System
A modern boat needs constant power for every move. Upgrading keeps your vessel reliable on long trips. A good marine electrical system does more than just power things. It also protects your investment and keeps you safe.
When you flip a switch, your boat should respond perfectly.
Assessing Current Needs and Selecting New Components
Begin by making a list of all devices on your boat. Note the power needs for LED lights, Garmin GPS, and bilge pumps. This helps you choose the right battery size for your habits.
Choosing high-quality parts from brands like Victron Energy or Blue Sea Systems is key. This ensures your system lasts a long time.
Choosing the right components keeps your system safe and efficient. Look for wires and breakers that can handle salt air. Make sure your engine alternator and new lithium batteries work well together. Planning for the future saves money and time. A good plan keeps your boat safe for every trip.